Menu
Call This Wednesday Get $50 Off Today
24 Hour Services
7 Days a Week
Call This Wednesday Get $50 Off Today
24 Hour Services
7 Days a Week

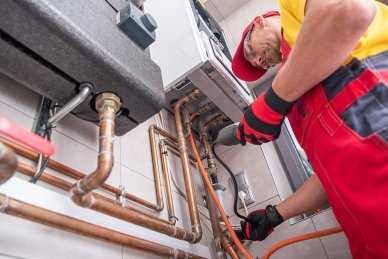
A water heater expansion tank is a small component that is installed just below the cold water inlet valve that feeds your home’s water heater. Basically, its purpose is to protect the hot water system of your house from excessive pressure that can damage the heater itself and other associated fixtures, lines and fittings. Like other components, it would normally wear out over the years, but you can extend its service life as much as possible by maintaining air pressure to the water pressure of your house. But when the time comes that it has gone bad and leaking, it would be best to repair it by installing a new one. While this task sounds difficult, it is actually easy with the right tools and some basic plumbing skills. Follow these steps:

1. After you bring a new tank home, make sure that all the proper valves are closed and the pressure is relieved from your hot water system. This includes turning the gas valves to “pilot” and draining the tank.
2. Remove one side of the support strap that helps keep your old tank in place, being screwed into the ductwork overhead. However, it is possible that your unit does not have a support strap, where tank is installed horizontally.
3. Place some towel on top of your water heater, below where the expansion tank is connected to the cold water line. As the old tank is probably containing water, be prepared for a spill.
4. Unscrew the tank from the threaded fitting in the line, where you might be able to get sufficient leverage to unscrew it without any tools, though channel locks would be very useful if you are not able to do it.
5. Before you install the new tank, add some Teflon tape to the male threads. When installing the new tank, twist it slowly into place and then tighten it down using channel locks.
6. After installing the new tank, test for leaks by slowly turning the cold water inlet valve back on. If there is no leak, secure the new tank with the existing metal strap that supported the old tank.
7. When the tank is securely in place, turn the gas valve back on, as well as the re-circulating pump and the return line valve.
Now, you have fixed your water heater expansion tank and protect it against potential damage from water hammer and thermal expansion. This entire process would generally take you less than half an hour—something you can do even if you are not particularly handy.
A water heater expansion tank is truly an important piece of safety equipment in your house, and it cannot work properly if you do not set it properly and test it regularly. You might want to include checking this component to your home maintenance schedule to make sure you will not face any problem with it time and again. After all, this is not a job that you cannot do without the help of professionals.
A kitchen stays busy all day. When something slows down the flow of…
A good look inside a drain line tells you the truth faster than…
A sewer line problem interrupts daily life quickly. Rooter Guard sees this…
A plumbing system reaches a point where repairs stop making sense. Many homeowners…
A dead disposal can bring a busy kitchen to a stop. When that…
Basements and crawl spaces face constant risk from excess water, especially during storms, snowmelt, or plumbing issues. Even a small amount of water intrusion can lead to costly damage, mold growth, and structural concerns that disrupt daily life. A modern solution comes in the form of smart sump pump systems,…
Learn More